Handling Sensitive Data
The goal of analytics is to understand the user journey in the application and their interaction with it, to better improve the user experience. To gather the necessary data, Smartlook follows user actions and records what users see on the screen. This indeed represents a challenge for protecting user privacy – out of decency, the law requirements, and also because the data itself is rarely needed for analytical purposes.
What analytics uses is the metadata.
There are several ways how Smartlook protects user privacy when gathering the information it needs for its purposes. Smartlook obfuscates out of the box the native visual elements that typically contain private information. The data are replaced by neutral colour boxes during the recording process, they never make it to our systems. Moreover, Smartlook offers a set of methods that enable application developers to avoid recording unnecessary information.
Also, Smartlook provides an open-source Consent SDK for iOS and Consent SDK for Android, that allows application authors to get user consent to gather the data for analytical purposes.
Handling UI with Sensitive Data
Potentially any UI element may contain sensitive information that should not be recorded. On the other hand, some elements that are not recorded by default may contain harmless data vital for analytics. Smartlook offers a comprehensive set of methods to handle various scenarios.
Terminologyin Smartlook, disabling UI elements recording is done by blacklisting it. Enabling UI elements recording is done by whitelisting it. Blacklisted UI elements are also called sensitive.
Most UI elements are whitelisted by default. Some types of UI elements (text edits, web views, etc.) are blacklisted by default.
There are three levels of granularity established for handling the sensitive data recording:
- individual UI elements recording
- UI element types recording
- the whole screen recording
In order to provide robust user privacy protection by default, some UI elements, namely text inputs and web views (that typically contain sensitive user data) are not recorded in the default Smartlook setup. The application author must take active steps to whitelist these elements in order to record their content.
Plaftorm overview
The support for individual sensitive data protecting methods depends heavily on the technology used for creating the particular user interface.
| Technology | Wireframe modes | No rendering | Individual elements sensitivity | Classes sensitivity |
|---|---|---|---|---|
| Native Android | supported | supported | supported | supported |
| iOS UIKit | supported | supported | supported | supported |
| iOS UISwift | supported | supported | coming soon | |
| Xamarin | supported | supported | supported | supported |
| React Native | supported | supported | ||
| Cordova/Ionic | supported | supported | ||
| Embedded WebView | supported | supported | ||
| Flutter | supported | supported | ||
| Unity | supported |
Handling Sensitivity of Individual UI Elements
In order not to record a particular view, like here in an example with an image view that shows a portrait image of the user, use a variable that holds a reference to the view with one of the following approaches to blacklist it.
val portraitImageView = findViewById(R.id.portrait_image_view) as ImageView
Smartlook.registerBlacklistedView(portraitImageView)
ImageView portraitImageView = (ImageView) findViewById(R.id.portrait_image_view);
Smartlook.registerBlacklistedView(portraitImageView);Smartlook.registerBlacklisted(object: self.portraitImageView)
self.portraitImageView.slSensitive = true[Smartlook registerBlacklistedObject: self.portraitImageView];
self.portraitImageView.slSensitive = YES;// This functionality is not available on this platform.// We have prepared two convenient ways, it's up to you which you like more
// React hook based
import { useSmartlookSensitiveRef } from 'smartlook-react-native-wrapper';
function MyFunctionalComponent() {
const ref = useSmartlookSensitiveRef<Image>(true);
return <PortraitImageView ref={ref} />;
}
// Or component based
import { SmartlookSensitiveComponent } from 'smartlook-react-native-wrapper';
class MyClassBasedComponent extends React.Component {
render() {
return (
<SmartlookSensitiveComponent isSensitive={true}>
<PortraitImageView />
</SmartlookSensitiveComponent>
);
}
}<!-- Use a css class .smartlook-hide to mark the element as a sensitive one. -->
<img class='smartlook-hide'><!-- Use a css class .smartlook-hide to mark the element as a sensitive one. -->
<img class='smartlook-hide'>// This functionality is not available on this platform.Smartlook.Analytics.RegisterBlacklistedObject(SomeView);When, on the other hand, an otherwise blacklisted view (in our example a web view) should be recorded, follow this example code:
val webView = findViewById(R.id.web_view) as WebView
Smartlook.registerWhitelistedView(webView)
WebView webView = (WebView) findViewById(R.id.web_view);
Smartlook.registerWhitelistedView(webView);Smartlook.unregisterBlacklisted(object: self.introWebView)
self.introWebView.slSensitive = false[Smartlook unregisterBlacklistedObject: self.self.introWebView];
self.self.introWebView.slSensitive = NO;// This functionality is not available on this platform.// We have prepared two convenient ways, it's up to you which you like more
// React hook based
import { useSmartlookSensitiveRef } from 'smartlook-react-native-wrapper';
function MyFunctionalComponent() {
const ref = useSmartlookSensitiveRef<Image>(false);
return <WebView ref={ref} />;
}
// Or component based
import { SmartlookSensitiveComponent } from 'smartlook-react-native-wrapper';
class MyClassBasedComponent extends React.Component {
render() {
return (
<SmartlookSensitiveComponent isSensitive={false}>
<WebView />
</SmartlookSensitiveComponent>
);
}
}<!-- Use a css class .smartlook-show to mark the element as a insensitive one. -->
<input type="text" class='smartlook-show'><!-- Use a css class .smartlook-show to mark the element as a insensitive one. -->
<input type="text" class='smartlook-show'>// This functionality is not available on this platform.Smartlook.Analytics.RegisterWhitelistedObject(SomeView);
XcodeNote also, that there is a small workaround that makes
slSensitiveproperty ofUIViewinspectable in Xcode Interface Builder, i.e., it is not necessary to create an@IBOutletfor a view that is designed in the Interface Builder just in order to set its sensitivity. See our How to make Smartlook properties inspectable cookbook.
More on this topic in API reference.
Handling Sensitivity of Classes
In some use-cases, whitelisting or blacklisting individual views is not practical, e.g., in an application that heavily uses web views for presenting some insensitive content, or if the application defines its own subclasses of visual components that present sensitive user data.
To cover this use-case, Smartlook offers on some platforms a convenient way to blacklist or whitelist all descendants of some class or visual elements that conform to a protocol.
Smartlook.registerBlacklistedClass(WebView::class.java)Smartlook.registerBlacklistedClass(WebView.class);Smartlook.registerBlacklisted(object: WKWebView.class)[Smartlook registerBlacklistedObject:WKWebView.class];Smartlook.Analytics.RegisterWhitelistedObject(WKWebView.Class);
On iOSit is also possible to blacklist or whitelist all instances of a
UIViewsubclass or allUIViewor all UIView subclasses that conform to a protocol.
More on this topic in API reference.
Handling Content Presented in WebViews
Native WebView classes are blacklisted by default. Its instances, or the whole class, must be whitelisted in order to record its content. However, a whitelisted web view can still contain HTML elements with sensitive content, and Smartlook thus does not record the HTML elements where the user enters data.
In order to change the default behavior, html elements that are not recorded by default can be whitelisted by assigning smartlook-show css class to them. Any html element that should not be recorded can be blacklisted by assigning smartlook-hide css class to it.
<input type="text" class='smartlook-show'>

<img class='smartlook-hide'>
More on this topic in API reference.
Rendering Modes: Handling Sensitive Data at the Whole Screen Level
This functionality is fully available only on some platforms. Please consult the API reference what rendering modes are available for a particular development toolchain.
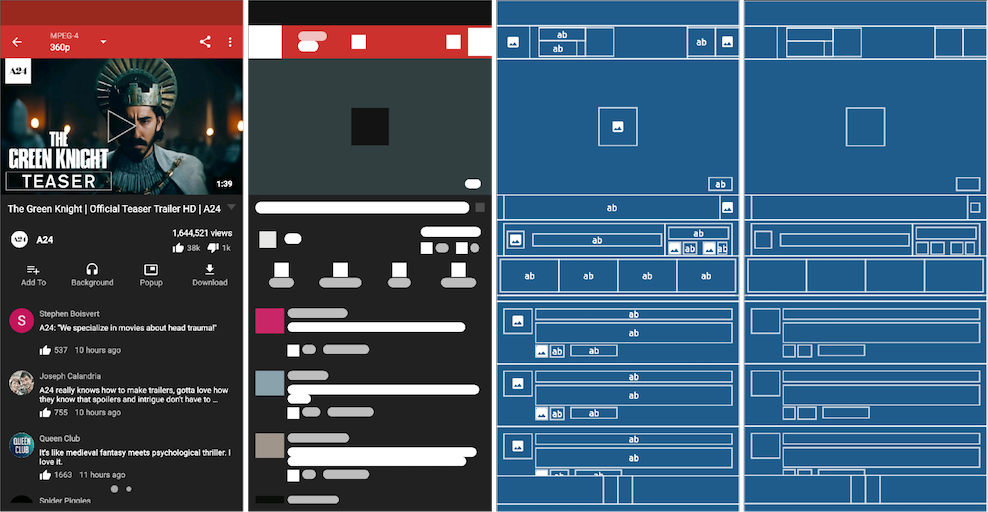
There can be scenarios when direct recording of the screen is not appropriate or necessary to understand the user behavior. In such cases, Smartlook can be instructed to use (permanently or just temporarily) one of its wireframe rendering modes.
When a wireframe mode is on, Smartlook draws a sketch of the screens instead of copying its content literally into the video. The principal UI elements and user interaction with them are still clearly distinguishable, but their actual look and content (texts, images) are replaced by an abstract representation.
Setting Rendering Mode
The default rendering mode for an application is set in the dashboard.
When debugging or experimenting to find the most suitable one for a particular application, the default rendering mode can also be set within the setup options. In production releases, this option should not be used.
The application can change the rendering mode at any time, e.g., to temporarily hide the sensitive user content on some screens. It is also possible to obtain the currently used values.
More about rendering modes could be found in the API reference.
Handling Sensitive Events
It is not just the visual elements that can contain sensitive information. Sometimes, a clue to sensitive user data can be found in user interaction events. Consider that, e.g., location of click events on a keyboard area could be used to guess a user’s password even when the keyboard itself is obfuscated.
Click events in the area of the system keyboard are never recorded by Smartlook. User interaction with custom input elements, e.g., custom PIN-Pad, must be filtered out programmatically by the application developer.
The default setting is to track all events (with the exception of events on the keyboard, for obvious user privacy reasons). When this is not desired, the application may fine-tune the level of tracked events.
Typically, the default Full Tracking mode is desired, as it gives a detailed picture of user activities.
On the other hand, on some screens the event location of touches on an otherwise blacklisted view can reveal sensitive private information (e.g., custom input view for PIN). In such a case, touches should not be recorded, and the application should switch temporarily to the Ignore User Interaction Events mode.
In specific cases, some apps that handle complex private information on particular screens may prefer stopping event recording altogether, by switching to the No Tracking mode for the screens.
Event tracking mode cannot be set on a per-UI-element basis, but only for the whole application.
More about event tracking modes can be found in the API reference.
Updated about 1 year ago